5 Tips About Effortless Smart Lock Installation
For fingerprint smart locks, installation is a crucial step that directly impacts your subsequent user experience and the lock’s lifespan. Sometimes, installation-related issues can lead to the entire lock system malfunctioning.
For instance, if the square steel hole is not large enough, pressing the handle to open the door can cause jamming. Similarly, if the fixed screw holes are insufficient, forcing the lock into place can cause misalignment of the front and rear panels, leading to handle jamming, or worse, the door may not open at all.
Installation might seem like a straightforward process: just put the lock body into the door, then attach the front and rear panels. However, even simple tasks can have hidden complexities.
Hole Position Alignment
The position of the holes is the most critical step in lock installation. Issues arising from misaligned holes are common, and this step is often overlooked.
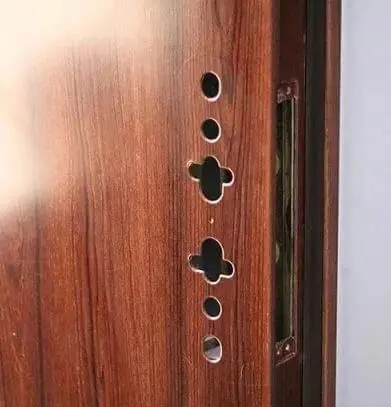
The image above shows the relatively standard smart lock hole positions post-2016, which are compatible with both traditional mechanical locks and modern fingerprint locks. As the industry matures, everything trends towards standardization and uniformity, including installation hole positions. Almost all manufacturers design their fingerprint lock installation holes according to the same standard.
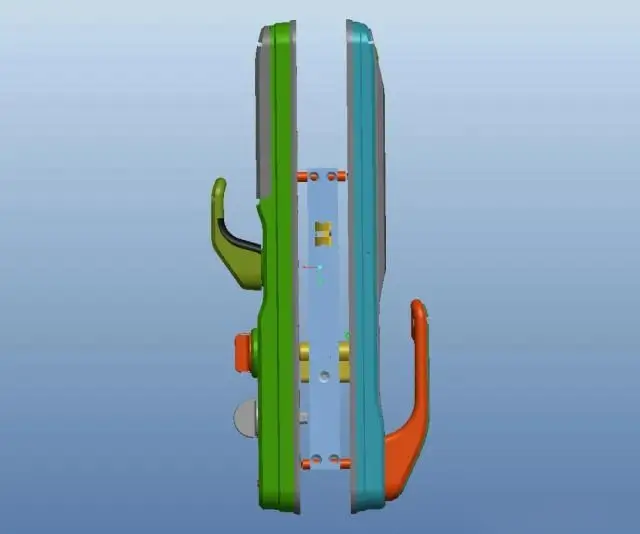
The above image shows the standard installation stud configuration for fingerprint smart locks. There are two connecting studs at the top and bottom to secure the front and rear panels, and two positioning studs in the middle to prevent the panel from sagging. If the panel sags, it can jam the square steel, making it difficult to open the door.
During installation, supervise the installer to ensure the two positioning studs are correctly installed. Older doors won’t have these positioning stud holes, so new holes need to be drilled. Some installers, to save effort, might skip this step, claiming the studs are unnecessary. Make sure this is done properly.
All studs or square steel passing through the door must have a surrounding gap of no less than 5mm. If the panel sags, it can touch the door edge, causing jamming or improper operation. Unlike mechanical locks, fingerprint smart locks have an additional connecting wire passing through the door to power the front and rear locks. Older door holes are typically just large enough for a single screw, so expansion is necessary.
During installation, the wire’s position should not be too close to any moving parts to avoid long-term wear, which could lead to disconnection or loosening. This issue is common with old door modifications, but new doors usually come with standard wire holes compatible with fingerprint smart locks.
Door Thickness For Smart lock
Door thickness corresponds to the installation kit size. The handle transmits the smart lock body via square steel to open the door. If the square steel detaches from the handle, it causes free rotation and makes the door impossible to open, potentially requiring forced entry.
Each fingerprint smart lock handle has a component on the back with a square hole, known as the anti-rotation sleeve. This piece allows the handle to drive the square steel, which in turn operates the lock body to open the door.
The depth of the square hole in the anti-rotation sleeve varies among manufacturers but generally includes a spring to ensure the square steel penetrates the lock body as much as possible.
The image shows how the square steel should penetrate the lock body. The middle section of the square steel is marked for positioning to ensure it only reaches a specific depth, while the part passing through has a length allowance for movement within the anti-rotation sleeve.
If the square steel is just at the critical point, it may work initially, but long-term wear can cause door opening issues. Remember, the installation kit size must match the door thickness. After the lock body is installed, ensure the square steel fully inserts into the lock body, leaving at least 1cm outside the door. If not, door opening issues may arise.
Smart Lock Body
Avoid using a lock body with dimensions differing from the original mechanical lock. This can cause four problems:
- Misalignment of the lock body within the door.
- Incompatibility with the upper and lower bolts, affecting their operation (removing the bolts resolves this issue).
- Increased gap between the door and frame.
- Lock body jamming, preventing it from resetting.
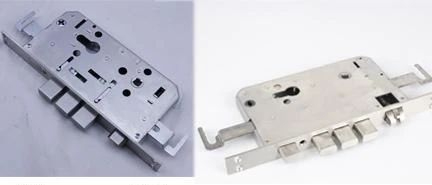
Misalignment occurs because lock body thickness varies (17mm, 20mm, 27mm). If replacing a 27mm lock with a 17mm lock, the 1cm difference causes a 5mm shift per side, enough to jam the square steel. The image shows locks of the same dimensions but different thicknesses.
Upper and lower bolt issues usually arise when replacing certain lock bodies with standard ones. Modifying the door holes slightly can make them compatible, but the bolt dimensions vary. If forced, the bolts may not operate correctly or may jam. If insisting on the installation, it’s advisable to remove the bolts.
Increased door and frame gaps are due to differences in lock tongue size. A typical cylindrical lock tongue has an 18mm diameter, while a standard square tongue is 12mm wide. Replacing an 18mm tongue with a 12mm one creates a gap between the lock tongue and strike plate, causing noise when the wind blows.
These three key points are crucial when installing a fingerprint lock. Ensuring these aspects are properly addressed minimizes the risk of installation issues. While most consumers will opt for professional installation, having a basic understanding can prevent potential problems and ensure a smoother installation process.
Smart lock body jamming can result from two issues: lock body malfunction or fixed upper and lower bolts. This often occurs when fitting a standard stainless steel door lock body into a wooden door. Wooden door lock slots are precisely cut for their specific lock bodies, but if the upper and lower bolts engage, they insert into the door, preventing the lock body from resetting. Wooden doors have specific lock bodies without upper and lower bolts, and experienced installers usually avoid this mistake unless deliberate.
For fully automatic locks, installation is especially important. All operations rely on a motor, which exerts a constant force. Unlike semi-automatic locks, where manual force can overcome minor jamming, a fully automatic smart lock may fail if the motor encounters resistance, triggering a motor stall and preventing door operation.